Understanding Networks - Ball Socket game
 - September 10, 2018
In the first class of understanding networks we were introduced to different network dynamics. We learned how computers connect to routers and what IP addresses are. We were introduced to centralized networks, distributed networks and investigated several real life networks - roadmaps, flightmaps, energy - and oilgrids, and their structure. Also we were introduced to the (OSI) Open systems Interconnection Reference Model.
This weeks assignment “Socket Game” was intended to introduce us to sockets and wifi communication. We were asked to design and build a device that could connect to a server using a TCP socket connection to play a game.
The game is further described here. It was optional whether we wanted to use the Arduino Uno and the Wifi101 shield, Arduino MKR1000, Ethernet Shields or a Raspberry Pi for this assignment. I chose to go with the Arduino MKR1000 since it seemed to be the most obvious choice for this assignment. I could be wrong though - and as I later found out the MKR1000 did leave me with some frustration as I will return to.
My experience with Arduino is very much based on our learnings from Physical Computing. Since it’s been a while I decided to start with the very basics in this assignment - setting up some buttons and getting a digital read. Supported by examples and code from Tom Igoe I quickly became more comfortable with it again. Although a bit rusty.
For the control of the game I used two buttons - one going to the left, one going to the right and then a potentiometer to control up and down. The potentiometer was coded with a big neutral zone where nothing would happen, whereas high and low reads would control the pad to go up and down. Aside from that a button was used to connect/disconnect to the game.
The early state:

Up until this point everything had been going fairly well. The different buttons would print (Serial.print) “l”, “r”, “d” and “u” to my Serial Monitor when pressing them. As a first step I decided to test the control using the command line interface from my computer. This was done through a pipe connecting the information from my controller to the IP address of the game.
$ cat /dev/cu/usbmodem1421 | nc 172.22.151.125 8080
This would allow me to test my controls and make a few adjustments to buttons where necessary.
The next step was to take advantage of the wifi board passing information directly to the IP address without using the command line. This turned out to more complicated than expected. Connecting to itpsandbox was no problem, but whenever I was trying to connect to the game - nothing would happen.
After several hours of frustration I decided to test the MKR1000 board - I isolated the client.connect(server, 8080) in the loop expecting my paddle to instantly connect to the game, without pressing any buttons, only to realize the the board didn’t work. This turned out to be the case with 5-6 other boards, until I found one that would give me what I was hoping for.
With my controller connecting to the game a could attach a red LED indicating my connection to the wifi and a green LED indicating my connection to the game.
This is what my final board looked like:
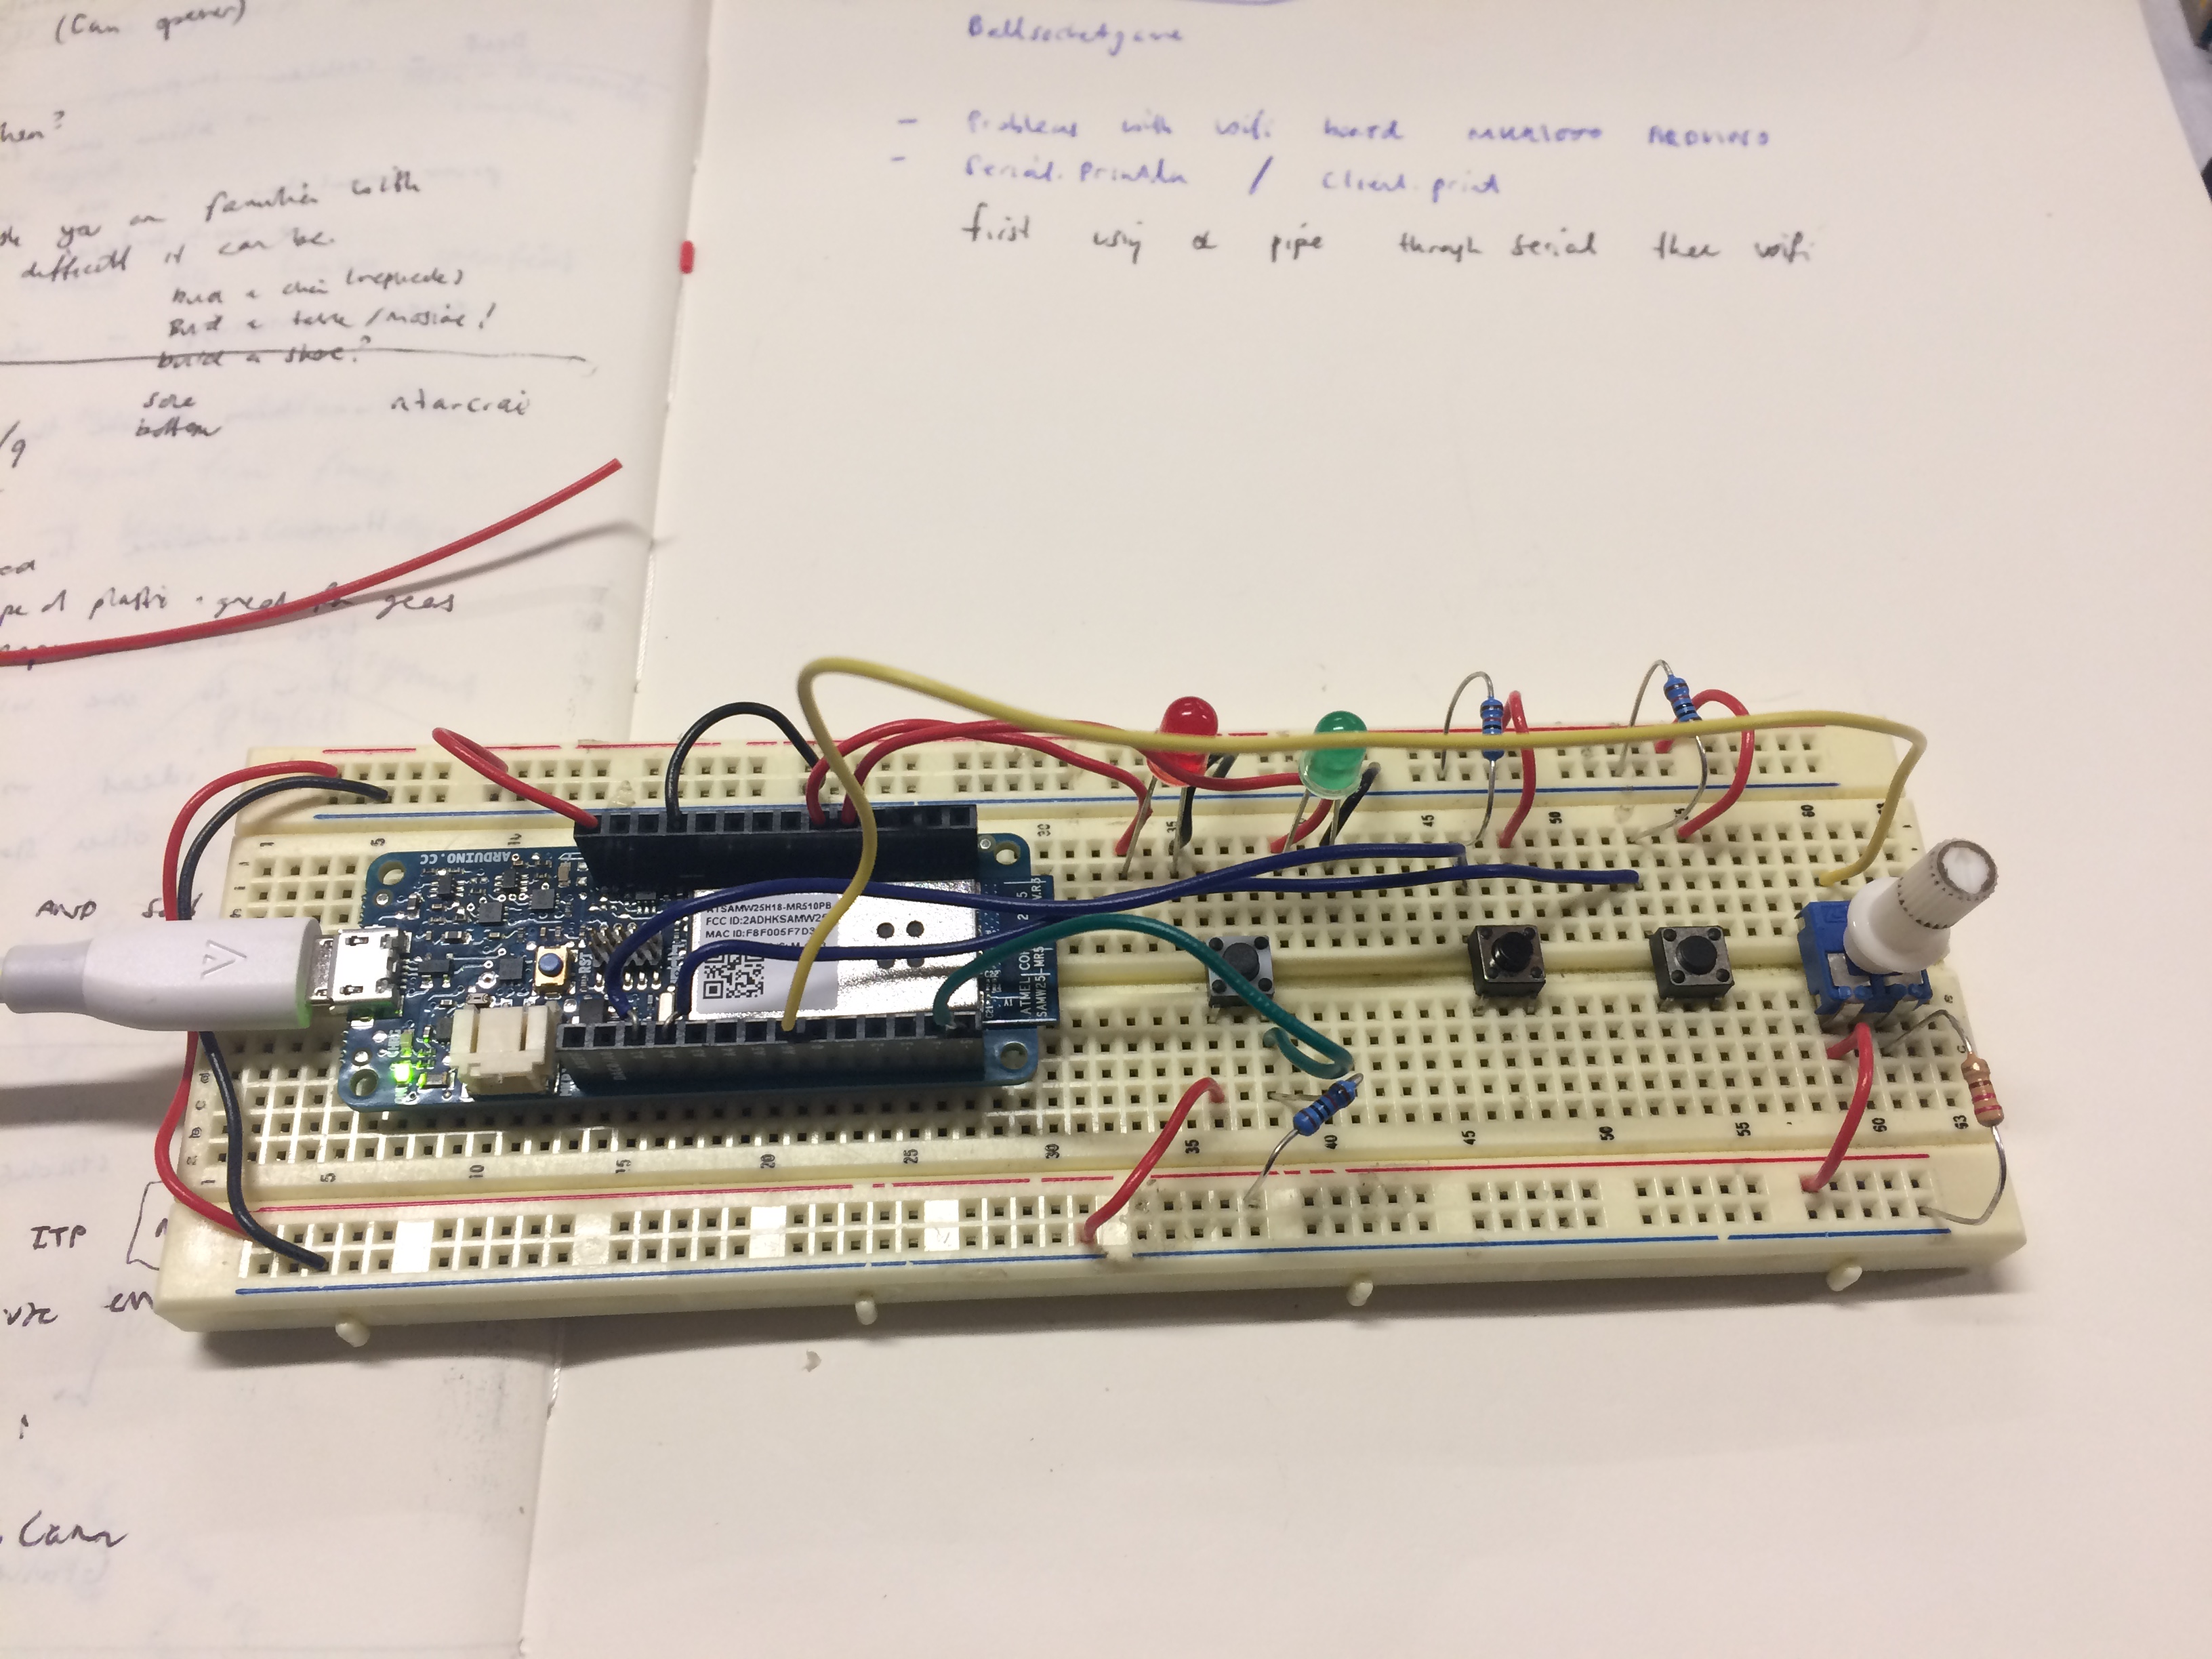
From a design-perspective it is not a beauty. However I do feel like the functionality of the board is good - especially the lights provide a great feedback, indicating whether you are connected to the wifi and/or the game. In general, this was a great assignment to get back into Arduino code.
Testing the final board:
It seemed my controller was working through the Wifi-shield. However it confused me that I couldn’t get the controller to work when powering it from a power plug in the wall. The best reason I can come up with is that when I upload the code using my computer and press Serial monitor it executes the script on the Arduino - connecting to the wifi. However when powering from the power plug I have no button to execute the code connecting to the wifi? I tried attaching another button to press for wifi connection - with no luck though - is that the right way to do it? If this doesn’t make sense I’ll ask during class. Along with a few other things.
Arduino code:
#include <SPI.h>
#include <WiFi101.h>

const char ssid[] = "";       //  your network SSID (name)
const char pass[] = "";   // your network password

WiFiClient client;                // instance of the WIFi client library
int status = WL_IDLE_STATUS;      // WiFi status
IPAddress server(128,122,6,155);       // address of the server

const int wifiConnectedLED = 11;
const int serverConnectLED = 10;
const int connectButton = 5;      // the pushbutton for connecting/disconnecting
const int connectionLED = 6;      // this LED indicates whether you're connected

const int sendInterval = 100;     // minimum time between messages to the server
const int debounceInterval = 15;  // used to smooth out pushbutton readings
int prevButtonState = 0;          // previous state of the pushbutton
long lastTimeSent = 0;            // timestamp of the last server message

void setup() {
  //Initialize serial and wait for port to open:
  Serial.begin(9600);
  // initialize digital inputs and outputs:
  pinMode(wifiConnectedLED, OUTPUT);
  pinMode(serverConnectLED, OUTPUT);
  pinMode(connectionLED, OUTPUT);
  pinMode(serverConnectLED, OUTPUT);
  pinMode(connectButton, INPUT_PULLUP);
  while (!Serial); // wait for serial port to connect.

  // attempt to connect to Wifi network:
  while ( status != WL_CONNECTED) {
    Serial.print("Attempting to connect to SSID: ");
    Serial.println(ssid);     // Connect to WPA/WPA2 network:
    status = WiFi.begin(ssid, pass);
    digitalWrite(wifiConnectedLED, LOW);
    // wait 3 seconds for connection:
    delay(3000);
  }

  // you're connected now, so print out the status:
  printWifiStatus();
}

void loop() {

  // message to send to the server:
  char message = 0;
  // note the current time in milliseconds:
  long now = millis();
  // check to see if the pushbutton's pressed:
  boolean buttonPushed = buttonRead(connectButton);


  // if the button's just pressed:
  if (buttonPushed) {
    // if the client's connected, disconnect:
    if (client.connected()) {
      Serial.println("disconnecting");
      client.print("x");
      client.stop();
    } // if the client's disconnected, try to connect:
    else {
      Serial.println("connecting");
      client.connect(server, 8080);
      client.print("n=SimonJensen\n");
    }
  }


//   client.connect(server, 8080);

//  // read the joystick:
  //could have been a digital read instead because these are buttons
  int sensorValue = analogRead(A1);
  int sensorValue2 = analogRead(A2);
  //must be analog
  int sensorValue3 = analogRead(A6);


  if (sensorValue == 1023) {
    Serial.println("l");
    client.print("l");
    delay(50);
  }
  if (sensorValue2 == 1023) {
    Serial.println("r");
    client.print("r");
    delay(50);
  }

  if (sensorValue3 > 950 ) {
    Serial.println("u");
    client.print("u");
    delay(50);
  }
  else if (sensorValue3 < 200) {
    Serial.println("d");
    client.print("d");
    delay(50);
  }

  if (client.connected()                     // if the client's connected
      && now - lastTimeSent > sendInterval   // and the send interval has elapased
      && message != 0) {                     // and there's a message to send
//    client.print(message);                   // send a message
//    Serial.print(message);
    //save this moment as last time you sent a message:
    lastTimeSent = now;
  }

  // set the connection LED based on the connection state:
  digitalWrite(serverConnectLED, client.connected());

  // if there's incoming data from the client, print it serially:
  if (client.available()) {
    char c = client.read();
    Serial.write(c);
  }
}

// this method reads the button to see if it's just changed
// from high to low, and debounces the button:
boolean buttonRead(int thisButton) {
  boolean result = false;
  int currentState = digitalRead(thisButton); // current button state

  if (currentState != prevButtonState         // if the button's changed
      && currentState == LOW) {               // and it's low
    result = true;                            // result is true
  }

  delay(debounceInterval);                    // debounce delay
  prevButtonState = currentState;             // save the button state for next time
  return result;
}

void printWifiStatus() {
  // print the SSID of the network you're attached to:
  Serial.print("SSID: ");
  Serial.println(WiFi.SSID());

  // print your WiFi shield's IP address:
  IPAddress ip = WiFi.localIP();
  Serial.print("IP Address: ");
  Serial.println(ip);

  // print the received signal strength:
  long rssi = WiFi.RSSI();
  Serial.print("signal strength (RSSI):");
  Serial.print(rssi);
  Serial.println(" dBm");
  // When you connect to wifi turn on light
  digitalWrite(wifiConnectedLED, HIGH);
}
_ * * * * * * * * * * * * * * * * * * * * * * * * * * * * * * * * * * * * * * * * * * * * * * * * * * * * * * * _
Update:
To answer my question of not having the controller connect to wifi without having the serial monitor. I found that this problem was simply due to one line of code:
while (!Serial); // wait for serial port to connect.
This line serves a “debug” line. It means that it waits for an active serial connection to be established by the PC (i.e., for the serial port to be opened by a piece of software). By removing that - the controller would activate immediately when connected to power.