Glucoseproject - Final
 - May 03, 2018
I decided to keep working on my midterm project: visualizing and comparing daily blood glucose measurements to recommended guidelines. One of the things I wanted to add to the existing project was a database and provide forms for users to input and update data in a simple way.
The final assignment was presented as follows:
Choose a dataset that you want to better understand and bring to life (it could be your own or data from a community around you). Using your Node/Mongo/Express application (or another dataset that you’ve collected), track that dataset over the course of at least 5-7 days. Your final project will be to design a digital or physical interface that brings your data to life in a way that you find personally meaningful.
I had most of the frontend design down. For that reason most of my work for this final would be backend code - setting up a form to enter information to a database. To set it up, I followed our in-class-boilerplate example. This would set up a git-repository, create a Heroku app and attach MongoDB to the app. The information for doing so can be found here.
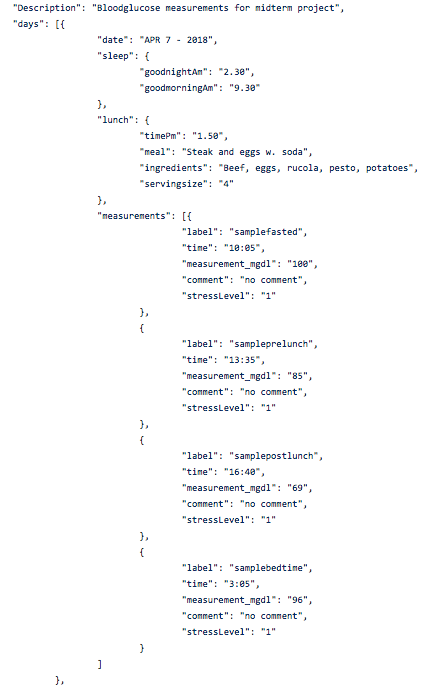
I had previously used a local json file to create my sketch. My code would loop through the days in the json file and place a new “day-card” for each of them. In a similar way, the sketch would loop through the number of glucose measurements each day and dynamically add charts for each measurement each day. For this reason it was important that the new data structure would mimic the one I had previously used in my local-file. Being thoughtful about this would allow me to reuse my previous javaScript code.
Old json structure:
New database structure:
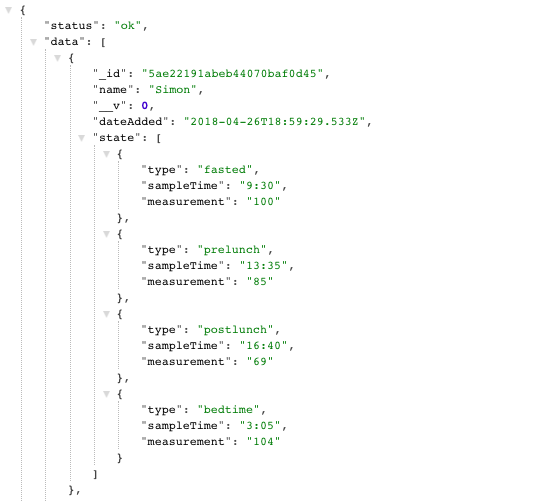 The new structure is a little more sparse on information, but down the
line I would like to implement more information similar to my initial data-collection.
The new structure is a little more sparse on information, but down the
line I would like to implement more information similar to my initial data-collection.
Making sure that the json files had a similar structure made the transition from a local file to a database really simple.
The next thing I did was to create a form where the user could input measurements. This was done in css - adding a small box to the corner of the screen which could expand and minimize when clicking
function controlPanel() {
  ///////////// OPEN AND CLOSE CONTROLPANEL /////////////////
  if (open == true) {
    $(".inputBox").animate({
      height: "800px",
      width: "400px",
      marginTop: "3%",
      marginLeft: "40%",
    }, 800)

    $(".menu").animate({
      width: "400px"
    }, 800)

    $(".buttonSubmit").animate({
      width: "400px"
    }, 800)

    $(".menu").text("CLOSE")

    $(".glucoseSchema").css("visibility", "visible")
  } else {
    $(".inputBox").animate({
      height: "50px",
      width: "100px",
      marginTop: "0px",
      marginLeft: "0px"

    }, 500)
    $(".glucoseSchema").css("visibility", "hidden")
    $(".menu").animate({
      width: "100"
    }, 500)
    $(".menu").text("OPEN")
  }
}

//////////////////////////////////////////////////////

//INPUT FOR FORM
  <form id="formToSend" >

      <div class="form-group">
        <label for="name">Name</label>
        <input type="text" name="Name" placeholder="enter name"
        class="form-control" id= "Name" required>
      </div>

      <div class="form-time"> Morning </div>


      <div class="form-group">
        <label for="time1">Time</label>
        <input type="text" name="Measure1Time" placeholder="Enter Time hh:mm"
         class="form-control" id="Measure1Time" required>
      </div>

      <div class="form-group">
        <label for="val1">Value</label>
        <input type="text" name="Measure1Value" placeholder="Enter Value"
         class="form-control" id="Measure1Value" required>
      </div>

      <br>
      <div class="form-time"> Lunch: Before </div>
      <div class="form-group">
        <label for="time2">Time</label>
        <input type="text" name="Measure2Time" placeholder="Enter time"
        class="form-control" id="Measure2Time" required>
      </div>

      <div class="form-group">
        <label for="val2">Value</label>
        <input type="text" name="Measure2Value" placeholder="Enter Value"
        class="form-control" id="Measure2Value" required>
      </div>

      <br>
      <div class="form-time"> Lunch: After </div>
      <div class="form-group">
        <label for="time3">Time </label>
        <input type="text" name="Measure3Time" placeholder="Enter Time"
        class="form-control" id="Measure3Time" required>
      </div>

      <div class="form-group">
        <label for="val3">Value</label>
        <input type="text" name="Measure3Value" placeholder="Enter Value"
        class="form-control" id="Measure3Value" required>
      </div>

      <br>
      <div class="form-time"> Bedtime </div>
      <div class="form-group">
        <label for="color">Time </label>
        <input type="text" name="Measure4Time" placeholder="Enter Time"
        class="form-control" id="Measure4Time" required>
      </div>

      <div class="form-group">
        <label for="color">Value</label>
        <input type="text" name="Measure4Value" placeholder="Enter Value"
        class="form-control" id="Measure4Value" required>
      </div>


      <button type="submit" class="buttonSubmit">Submit</button>
    </form>


  </div>
</div>
This is what the form looked like:
Displaying information from Database step 1.
Using a form I would send information to my database (The stored information can be seen using the route
/showDBdata). Another route would render a html file with a script making an $.ajax “get” request to retrieve the stored data and create the visualization that is seen (/DisplayData -> showGlucose.html -> script.js -> $.ajax get).
This worked really well and the information that I entered displayed on my page successfully. What I later realized though, was that my page would have to reload every time I made a new submit/get request.
Displaying information from Database step 2.
To avoid the reload, I changed my $.get request to a post request. Now when submitting the information from my form I would save the information to my dataBase and display it right away, preventing the default behavior using the e.preventDefault() function.
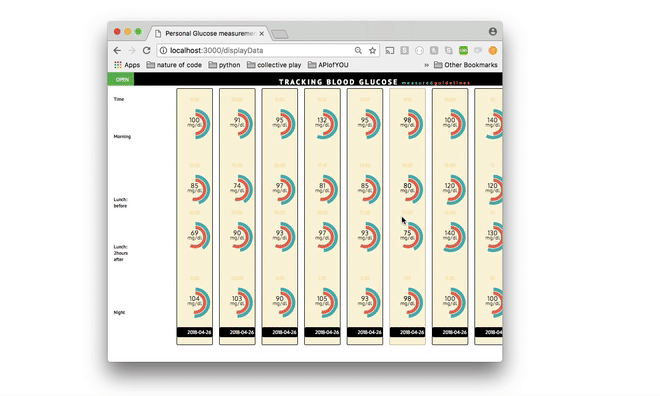
This is what the final project looked like when presenting:

Future additions.
Down the line I would like to add a login to the site. I have never attempted user authentication and figured
it would be interesting to explore. Also - turning this into a chrome extension is something I would like to play around with.
More information about the sketch can be read on my first midterm post here.
The code from this example can be found on github here.